Tuesday 15 April 2014

Winsplit-Revolution

 What is Winsplit-Revolution ?

WinSplit Revolution is a small utility which allows you to easily organize your open windows by tiling, resizing and positioning them to make the best use of your desktop real estate.
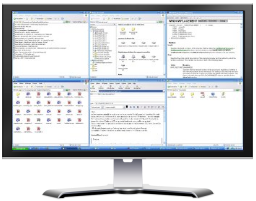
WinSplit is especially useful for high-end LCD screens with high resolutions because it helps you to efficiently manage many active windows. As you can see on the screenshot on the right, the advantages of using WinSplit is that it saves you from having to drag and drop windows by allowing you to snap windows into specific tiled configurations using simple keyboard hotkeys.
It is also useful for owners of multi-monitors systems, as it can move a window from one screen to one other by simply hit a hotkey.
It has also been improved with some features dedicated to the active window like "taking screenshots", "applying the always on top style", "setting transparency", and many others.

Quick use
Modern day monitors continually provide higher resolutions and for this reason we've developed a simple program that permits you to "divide" your screen into several parts: halves, thirds, fourths, etc...
For instance, a window can be resized and moved to the left half, the right half, the top, a corner... of the screen.
Once the program is launched, an icon appears in the system tray: 
To affect a window in a zone of your desktop, by default just use the pop-up frame (virtual numpad) or hotkeys on your keyboard, which are by default:Ctrl+Alt+numpad.
The window's positioning respects the numeric keypad scheme. Typically: "Ctrl + Alt + 1" corresponds to the bottom left part of the screen.
See the help page for other compliant functions that have been achieved.

Download :- http://winsplit-revolution.com/download

Sunday 13 April 2014

Install Windows XP, Windows 7 And Windows 8/8.1 From The Same USB Drive

Do you want to create a bootable USB drive containing Windows XP, Windows 7 and Windows 8/8.1 installation files to avoid creating multiple bootable USB drives? Would you like to install Windows XP, Windows 7 and Windows 8/8.1 from the same USB drive? If you said yes to above questions, you have come to the right place.


In this guide, we will show you how to create a bootable USB drive containing Windows XP, Windows 7 and Windows 8/8.1 installation files and install XP, 7 and 8/8.1 from the same USB drive.
Things you need:
# Windows XP ISO file or DVD
# Windows 7 ISO file
# Windows 8/8.1 ISO file
# 8 GB+ USB flash drive
Procedure:
Step 1: Connect your 8GB+ USB flash drive to your PC and backup all data before proceeding further, as the drive will be erased while making it bootable.
Step 2: Head over to this page and download the newest version of WinSetupFromUSB zip file. Extract the zip file to get WinSetupFromUSB folder containing separate executable for x86 and x64 versions of Windows.
Step 3: Depending on the version of Windows you’re running, double-click either on WinSetupFromUSB.exe or WinSetupFromUSB x64 to launch the software.


Step 4: Once WinSetupFromUSB is launched and running, select your USB pen drive under USB disk selection and format tools section (see picture) and select Auto format it with FBinst option. Also select FAT32 as file system instead of NTFS if you want your multi-boot USB to be compatible with both BIOS and U/EFI.

Step 5: Skip this step if you don’t want to add Windows XP files to the USB. Select the check box under Windows 2000/XP/2003 Setup and then click the browse button to browse to the i386 folder in your Windows XP DVD or ISO file. Note that if you have the ISO file, you need to mount the ISO file using a third-party software or using the built-in Mount feature in Windows 8/8.1.


If you’re on Windows 7, we suggest you go through our how to mount an ISO file in Windows 7 guide for detailed instructions.
Once you have selected the I386 folder, proceed to the next step.
Step 6: Next, select the check box under Windows Vista/7/8/Server 2008/2012 based ISO, click on the browse button and browse to location where you have saved your Windows 7 ISO file. Select the ISO file and click Open button.


Step 7: Now that you have chosen to add Windows XP and Windows 7 to the USB drive and make it bootable, check the Advanced options box to open Advanced Options dialog, select the option titled Custom menu names for Vista/7/8/Server Source. This will enable you add your own custom names to your Windows 7 and Windows 8 setups in the boot menu.

Once done, close Advanced Options dialog.
Step 8: Finally, click GO button. Click on the Yes button when you see the Warning messages. If you have selected Custom menu names for Vista/7/8, you’ll see a small dialog box asking you to enter custom name for Windows setup. Enter a name and click OK button to allow WinSetupFromUSB begin its job.


NOTE: We’ll add Windows 8/8.1 to the USB in the next step.
Step 9: Once done, you’ll see Job done message on the screen. Don’t close WinSetupFromUSB yet as we have yet to add Windows 8/8.1 installation files to the USB. And if you don’t want to add Windows 8/8.1 files, you can stop the procedure here and close the application.


Step 10: In order to add Windows 8/8.1 installation files, select the option titled Windows Vista/7/8/Server 2008/2012 based ISO and then select your Windows 8/8.1 ISO file (make sure that the same USB drive is selected).

Step 11: Enable the option titled Advanced Options and then select Custom menu names for Vista/7/8/Server source.

Step 12: Finally, click the GO button. Click Yes button when you see warning dialogue boxes and enter a name for the setup when you’re asked to do so. That’s it! Your bootable USB containing Windows XP, Windows 7 and Windows 8/8.1 should be ready in a couple of minutes. Good luck!


Once done, you can connect the USB drive to your PC or any other PC on which you want to install Windows XP, Windows 7 or Windows 8/8.1, and then boot from the USB. You’ll see the following screen, where you need to select the Windows setup that you would like to start.


And if your PC doesn’t support booting from USB, please refer to our how to boot from USB even if your PC doesn’t support booting from USB guide.

Download :- http://www.winsetupfromusb.com/downloads/