Saturday 15 December 2012
HDD Encryption
Odin HDD Encryption is a powerful Hard Disc Drive Encryption software which can protect,secure,encrypt your hard disc drive,virtual hard disk(VHD),USB flash files,removable drive.It can makes a part or all your hard disc into a secure vault.And it also can creates a virtual encrypted disk within a file and mounts it as a real disk.No one can log into except you have passwords.Any organization, from a small company to a large international firm with thousands of users in the field, can effectively protect business plans, client lists, product specifications, confidential corporate memos, stock information, and much more with this disk encryption product.Spotlight:very easy to operate,protect your encryption data from virus infection.
EnCrypt entire Hard Disk, Hard Disc Partition, VHD, USB
allows both, the encryption of parts or 100% of your HardDisk ,VHD,file volume, as well as the creation of a virtual container file that will store all the encrypted information.And it can also optionally automatically request the users authentication data as soon as the USB device is inserted. When the USB disk is removed from the computer, all the data are automatically inaccessible to unauthorized persons.
Easy to operate,Protect data from virus infection
HDD Encryption software requires minimal administration and user training. Disk encryption is completely transparent, requiring no change in the way users work with the computer and it will protect your data even if your computer be infected by virus.
Maximize Your Security, Minimize Your Risk
protects your data with very fast and a true "on the fly" disk encryption process. Other products that claim to be "on the fly" decrypt an entire file and load it into memory, creating significant security risks. HDD encrypt software is smarter and more secure because it decrypts only the specific portion of a file that is in use. Unprotected data never resides on a encrypted hard drive.
Disk Partition and file volume encryption
allows both, the encryption of an entire Hard Disk partition, as well as the creation of a virtual container file that will store all the encrypted information.
Works on any Storage Medium
works on any kind of Hard Disk, and removable medium such as Floppy-, Zip-, Jazz-, Sygate-, CD-Rom, DVD- Drives etc… and manages up to 16 TERABITE of encrypted data or 4 GB.
Features
1. Creates a virtual encrypted disk within a file and mounts it as a real disk.
2. Encrypts an entire partition or storage device such as USB flash drive or hard drive.
3. Encrypts a partition or drive where Windows is installed (pre-boot authentication).
4. Encryption is automatic, real-time (on-the-fly) and transparent.
5. Parallelization and pipelining allow data to be read and written as fast as if the drive was not encrypted.
6. Provides plausible deniability, in case an adversary forces you to reveal the password:Hidden volume (steganography) and hidden operating system.
7. Create multiple Secure Disks from hard disks or USB disks.
8. No size limitation for encrypted disks.
9. Full or partial hard disk encryption.
10.Invisible operating system (allows hiding the entire operating system.
Installation :-
--------------
1. Unpack
2. Install
3. Copy Crack in Installation Directory.
4. Enjoy it !!!!!!!!
Download :-
http://www.4shared.com/rar/E0MDjmbt/HDD_Encryption.html
Web Site Grabber 7
Web Site Grabber-7 is easy-to-use software for data extraction from a website. You can get many types of the web site information: links to HTML pages, images, music, video, torrent and XML files or any other file extensions. Using custom text pattern Web Site Grabber-7 can grabs any specific information.You can control lists of file extensions and text patterns, set mask for skip pages, save and load projects and results. So you can load result to next project for continue grab information from next web site.
================
[INSTALL NOTES]
================
Step 1: unpack rar archive
Step 2: run the setup
Step 3: Use the given keygen to activate
Step 4: Enjoy and Support Developers, Buy It, They Deserved It!
Download :-
http://www.4shared.com/rar/ec05yu4w/Web_Site_Grabber-7.html
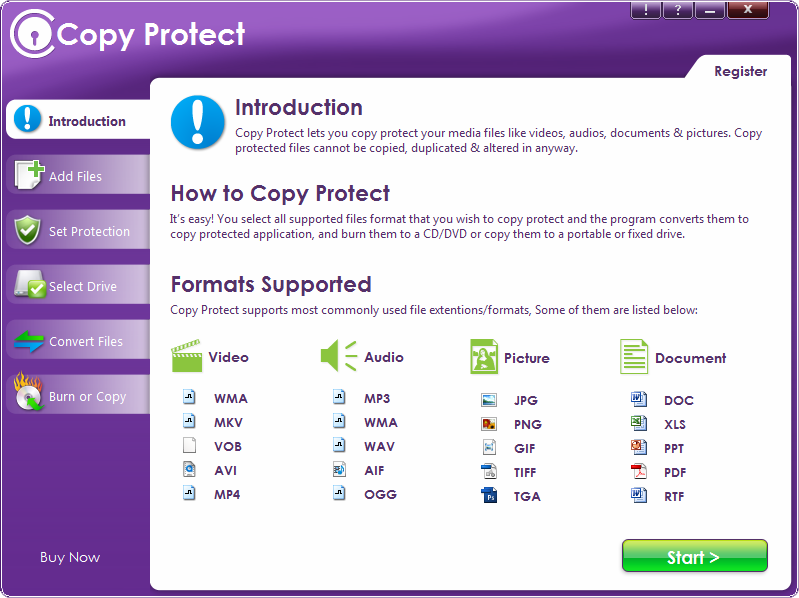
Copy Protect
Copy Protect is unique software that lets you copy protect your audios, videos, documents and pictures so that they cannot be duplicated, copied or distributed by illegal means. It is the only tool that lets you fight the piracy of your media files like audios, videos, pictures and documents (lots of formats supported).
Copy Protect converts all supported formats into executable applications that run only in the drives they are prepared for. If these files are copied to another drive, they do not run and become useless. These executable applications do not require any administrative rights to run and therefore there is no need to install Copy Protect at the other end to play copy protected media files Furthermore, the program comes with a special built-in picture and document viewer that lets you view and read your copy protected files; and a
built-in player for your copy protected videos and audios. With Copy Protect's playlist option, you can also organize and manage all your media files. Copy Protect will secure all your media files and prevent illegal distribution of copyrighted material.
· Unbreakable copy protection for your videos, audios, pictures and documents.
· Burn copy protected data to your own CD or DVD for distribution without the fear of data being copied illegally.
· Easy to use and navigate graphical user interface that does not require any additional programming skills.
· Simple and effective data copy protection procedures.
· Protect your media files and art work from illegal copy from one computer to another.
· Securely distribute your films, songs, files, documents, reports and other copyright material on any distribution media like CD, DVD, Blu-ray disc, USB drive, external drive etc.
· Highly customized copy protection application to tailor your needs.
· Play copy protected videos and audios directly from the destination drive where you have saved them.
· No need to install the application at other end to run the copy protected files and documents.
· Prevent image theft, piracy, illegal distribution and leakage of your data from your CD/DVD or USB drive to any other drive.
· Fully compatible on all file systems like FAT, FAT32 and NTFS.
Download :-
http://www.4shared.com/rar/qecxDQp4/Copy_Protect_Ver_150.html
Monday 10 December 2012
Create One-Click Shutdown and Reboot Shortcut.
Create One-Click Shutdown and Reboot Shortcuts
First, create a shortcut on your desktop by right-clicking on the desktop, choosing New, and then choosing Shortcut. The Create Shortcut Wizard appears. In the box asking for the location of the shortcut, type shutdown. After you create the shortcut, double-clicking on it will shut down your PC.
But you can do much more with a shutdown shortcut than merely shut down your PC. You can add any combination of several switches to do extra duty, like this:
shutdown -r -t 01 -c "Rebooting your PC"
Double-clicking on that shortcut will reboot your PC after a one-second delay and display the message "Rebooting your PC." The shutdown command includes a variety of switches you can use to customize it. Table 1-3 lists all of them and describes their use.
I use this technique to create two shutdown shortcuts on my desktop—one for turning off my PC, and one for rebooting. Here are the ones I use:
shutdown -s -t 03 -c "Bye Bye m8!"
shutdown -r -t 03 -c "Ill be back m8 ;)!"
Switch
What it does
-s
Shuts down the PC.
-l
Logs off the current user.
-t nn
Indicates the duration of delay, in seconds, before performing the action.
-c "messagetext"
Displays a message in the System Shutdown window. A maximum of 127 characters can be used. The message must be enclosed in quotation marks.
-f
Forces any running applications to shut down.
-r
Reboots the PC.
Wednesday 5 December 2012
List of Windows 8 Shortcuts
With a paradigm shift in how we look at a Start screen, Windows 8 has added a lot of shortcuts for easier navigation. Check out a loooooong list of shortcuts for Windows 8 to make your life simpler.
Windows key: Switch between Modern Desktop Start screen and the last accessed application
Windows key + C: Access the charms bar
Windows key + Tab: Access the Modern Desktop Taskbar
Windows key + I: Access the Settings charm
Windows key + H: Access the Share charm
Windows key + K: Access the Devices charm
Windows key + Q: Access the Apps Search screen
Windows key + F: Access the Files Search screen
Windows key + W: Access the Settings Search screen
Windows key + P: Access the Second Screen bar
Windows key + Z: Brings up the App Bar when you have a Modern Desktop App running
Windows key + X: Access the Windows Tools Menu
Windows key + O: Lock screen orientation
Windows key + . : Move the screen split to the right
Windows key + Shift + . : Move the screen split to the left
Windows key + V: View all active Toasts/Notifications
Windows key + Shift + V: View all active Toasts/Notifications in reverse order
Windows key + PrtScn: Takes a screenshot of the screen and automatically saves it in the Pictures folder as Screenshot
Windows key + Enter: Launch Narrator
Windows key + E: Open Computer
Windows key + R: Open the Run dialog box
Windows key + U: Open Ease of Access Center
Windows key + Ctrl + F: Open Find Computers dialog box
Windows key + Pause/Break: Open the System page
Windows key + 1..10: Launch a program pinned on the Taskbar in the position indicated by the number
Windows key + Shift + 1..10: Launch a new instance of a program pinned on the Taskbar in the position indicated by the number
Windows key + Ctrl + 1..10: Access the last active instance of a program pinned on the Taskbar in the position indicated by the number
Windows key + Alt + 1..10: Access the Jump List of a program pinned on the Taskbar in the position indicated by the number
Windows key + B: Select the first item in the Notification Area and then use the arrow keys to cycle through the items Press Enter to open the selected item
Windows key + Ctrl + B: Access the program that is displaying a message in the Notification Area
Windows key + T: Cycle through the items on the Taskbar
Windows key + M: Minimize all windows
Windows key + Shift + M: Restore all minimized windows
Windows key + D: Show/Hide Desktop (minimize/restore all windows)
Windows key + L: Lock computer
Windows key + Up Arrow: Maximize current window
Windows key + Down Arrow: Minimize/restore current window
Windows key + Home: Minimize all but the current window
Windows key + Left Arrow: Tile window on the left side of the screen
Windows key + Right Arrow: Tile window on the right side of the screen
Windows key + Shift + Up Arrow: Extend current window from the top to the bottom of the screen
Windows key + Shift + Left/Right Arrow: Move the current window from one monitor to the next
Windows key + F1: Launch Windows Help and Support
PageUp: Scroll forward on the Modern Desktop Start screen
PageDown: Scroll backward on the Modern Desktop Start screen
Esc: Close a charm
Ctrl + Esc: Switch between Modern Desktop Start screen and the last accessed application
Ctrl + Mouse scroll wheel: Activate the Semantic Zoom on the Modern Desktop screen
Alt: Display a hidden Menu Bar
Alt + D: Select the Address Bar
Alt + P: Display the Preview Pane in Windows Explorer
Alt + Tab: Cycle forward through open windows
Alt + Shift + Tab: Cycle backward through open windows
Alt + F: Close the current window Open the Shut Down Windows dialog box from the Desktop
Alt + Spacebar: Access the Shortcut menu for current window
Alt + Esc: Cycle between open programs in the order that they were opened
Alt + Enter: Open the Properties dialog box of the selected item
Alt + PrtScn: Take a screen shot of the active Window and place it in the clipboard
Alt + Up Arrow: Move up one folder level in Windows Explorer (Like the Up Arrow in XP)
Alt + Left Arrow: Display the previous folder
Alt + Right Arrow: Display the next folder
Shift + Insert: CD/DVD Load CD/DVD without triggering Autoplay or Autorun
Shift + Delete: Permanently delete the item (rather than sending it to the Recycle Bin)
Shift + F6: Cycle backward through elements in a window or dialog box
Shift + F10: Access the context menu for the selected item
Shift + Tab: Cycle backward through elements in a window or dialog box
Shift + Click: Select a consecutive group of items
Shift + Click on a Taskbar button: Launch a new instance of a program
Shift + Right-click on a Taskbar button: Access the context menu for the selected item
Ctrl + A: Select all items
Ctrl + C: Copy the selected item
Ctrl + X: Cut the selected item
Ctrl + V: Paste the selected item
Ctrl + D: Delete selected item
Ctrl + Z: Undo an action
Ctrl + Y: Redo an action
Ctrl + N: Open a new window in Windows Explorer
Ctrl + W: Close current window in Windows Explorer
Ctrl + E: Select the Search box in the upper right corner of a window
Ctrl + Shift + N: Create new folder
Ctrl + Shift + Esc: Open the Windows Task Manager
Ctrl + Alt + Tab: Use arrow keys to cycle through open windows
Ctrl + Alt + Delete: Access the Windows Security screen
Ctrl + Click: Select multiple individual items
Ctrl + Click and drag an item: Copies that item in the same folder
Ctrl + Shift + Click and drag an item: Creates a shortcut for that item in the same folder
Ctrl + Tab: Move forward through tabs
Ctrl + Shift + Tab: Move backward through tabs
Ctrl + Shift + Click on a Taskbar button: Launch a new instance of a program as an Administrator
Ctrl + Click on a grouped Taskbar button: Cycle through the instances of a program in the group
F1: Display Help
F2: Rename a file
F3: Open Search
F4: Display the Address Bar list
F5: Refresh display
F6: Cycle forward through elements in a window or dialog box
F7: Display command history in a Command Prompt
F10: Display hidden Menu Bar
F11: Toggle full screen display
Tab: Cycle forward through elements in a window or dialog box
PrtScn: Take a screen shot of the entire screen and place it in the clipboard
Home: Move to the top of the active window
End: Move to the bottom of the active window
Delete: Delete the selected item
Backspace: Display the previous folder in Windows Explorer Move up one folder level in Open or Save dialog box
Esc: Close a dialog box
Num Lock Enabled + Plus (+): Display the contents of the selected folder
Num Lock Enabled + Minus (-): Collapse the selected folder
Num Lock Enabled + Asterisk (*): Expand all subfolders under the selected folder
Press Shift 5 times Turn StickyKeys on or off
Hold down right Shift for 8 seconds Turn FilterKeys on or off
Hold down Num Lock for 5 seconds Turn ToggleKeys on or off
Hold down right Shift for 8 seconds Turn FilterKeys on or off
Hold down Num Lock for 5 seconds Turn ToggleKeys on or off
Monday 3 December 2012
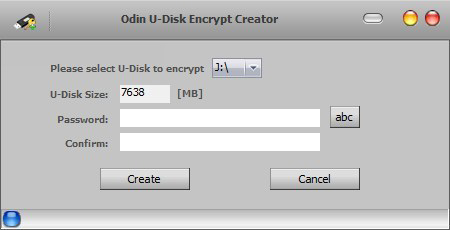
Odin U Disk Encrypt Creator
Odin U Disk Encrypt Creator is a very useful U disk/Flash drive encryption tool. Its friendly interface guides you encrypt your U disk/Flash drive/Portable Hard Drive/Mobile Hard Drive easily.Odin U Disk Encrypt Creator encrypt/protect the external drives with the strong password to ensure absolute confidentiality of your data. After you encrypted your u disk/flash drive with Odin U Disk Encryption Creator,No one can open the files and documents located on your USB storage device except you.Spotlight:The drives protected with Odin U disk Encrypt Creator can be used with other Windows computers, without needing to install Odin U Disk Encrypt Creator on the computer.And protect your data even if your computer has been infected by virus.
System Requirement:
Supported OS: Windows NT4/2000/2003/XP/Windows Vista/Windows 7
Processor: >750MHz Intel or AMD CPU
Free hard disk space: 100 MB or more
RAM: 256 MB or above
Homepage: http://www.odinshare.com/u-disk-encrypt-creator.html
Installation Instructions:
1. Install program
2. Use given key with any name to register application.
3. Done, Enjoy..
Download :- http://www.4shared.com/rar/6IXRAjXO/OdinShare_Odin_U_Disk_Encrypt_.html
Saturday 1 December 2012
How to Send Files Up to 10 GB in G-mail
How to Send Files Up to 10 GB in G-mail

But this can be done in newer compose window. If you have not already switched to newer compose window, its time to switch and enjoy new cool features of Gmail.
Follow these steps to send Larger Files in email.
. Login in to your Gamail Account.
. Click on the compose button and a compose window will pop up on your screen.
. Here take mouse pointer over the + icon at the bottom of compose window and you will see few more options.


. After this, the file will be attached to the email. Now Add recipient and subject and send the mail. If the Drive is not shared with any one, it will pop a dialog to give access privilage to other person.

Now enjoy limitless file sending on Gmail. Maximum limit is 10 GB which will suit you for your all kind of requirement. Now you can also send Movies and big size softwares.
But Google Drive comes with limited amount of space for free. Take care of this always. You will have to delete older file having big size to free space.
Sunday 11 November 2012
Open more than 75 files with a single software
Open more than 75 files with a single software
We need many type of files which we use daily. And for using each file we need a different software. So we have to install many softwares in the system which also affect our system's speed. But there is a software which is able to support more than 75 file types. All your. By installing this single software in your system, you can save space of many softwares. Now you do need to install different software for different file type.
Supported File Formats
Code Files (.vb, .c, .cs, .java, .js, .php, .sql, .css, .aspx, .asp)
Web Pages (.htm, .html)
Photoshop Documents (.psd)
Images (.bmp, .gif, .jpg, .jpeg, .png, .tif, .tiff)
XML Files (.resx, .xml)
PowerPoint Presentations (.ppt, .pptx, .pps)
Media (.avi, .flv, .mid, .mkv, .mp3, .mp4, .mpeg, .mpg, .mov, .wav, .wmv, .3gp, .flac)
Microsoft Word Documents (.doc, .docx)
SRT Subtitles (.srt)
RAW Images (.arw, .cf2, .cr2, .crw, .dng, .erf, .mef, .mrw, .nef, .orf, .pef, .raf, .raw, .sr2, .x3f)
Icons (.ico)
Open XML Paper (.xps)
ML Paper (.xps)
Torrent (.torrent)
Flash Animation (.swf)
Archives (.7z, .gz, .jar, .rar, .tar, .tgz, .zip)
Rich Text Format (.rtf)
Text Files (.bat, .cfg, .ini, .log, .reg, .txt)
Apple Pages (.pages)
Microsoft Excel Documents (.xls, .xlsm, .xlsx)
Comma-Delimited (.csv)
Outlook Messages (.msg)
PDF Documents (.pdf)
vCard Files (.vcf)
EML Files (.eml)
Download Here
Mirror Link :-
http://www.4shared.com/file/Cd4wVkqb/freeopener.html
Saturday 3 November 2012
Windows 8 keyboard shortcuts
Windows 8 keyboard shortcuts
Microsoft has designed Windows 8 for touchscreens, but many of us will still be using the old keyboard and mouse to get around. So, it's time to learn the Windows 8-specific keyboard shortcuts.
In the video above, you can see most of the basic shortcuts in action. This is essential knowledge for any Windows 8 user sitting in front of a keyboard. The vast majority of these shortcuts start with the Windows button on the keyboard, and are completed by pressing another key simultaneously.
The basics
| Windows key | Your "get out of jail free" card. Striking the Windows key by itself will return you to the home screen. |
|---|---|
| Windows + D | This command will exit whatever app you are in and take you to the Desktop view. Expect this to be a favourite of gamers for some time to come. |
| Type anything | From the home screen, typing anything on the keyboard will launch a universal search. By default, this will search first for apps, but you can quickly switch to search a number of fields, including the web. |
| Windows + C | The Charms menu is one of the iconic features of Windows 8. To access the Charms without a touchscreen, use Windows + C, then the cursor keys and Enter to choose the Charm you are looking for. |
| Windows + Q | If poking around in the Charms is too much bother, Windows + Q will skip the first step and take you straight to Search. This is context sensitive, so it will launch a search based on the app you are in. |
| Windows + I | Microsoft wants you to forget about Control Panel (even though it is still available). To jump into your system's settings, start with this command. |
| Windows + W | If you need to search for a specific setting to adjust, this combo will bring up a search box dedicated to the task. |
| Windows + H | Similar to iOS and Android, Windows 8 now shares content from app to app. Looking at a photo and want to email it? Press Windows + H in the photo gallery, and you're away. |
| Windows + "." | Windows 8 can display two apps at the same time. Windows + full-stop snaps them into position, changintg the position if you repeat the command. |
| Windows + Z | The full-screen app experience is one of the key design tenants in Windows 8, but this means that all of your options are hidden. To reveal them, press Windows + Z. |
| Windows + L | When the day is done and it's time to put Windows to bed, Windows + L will lock your screen. |
More advanced commands
| Windows + X | Probably the most useful command for advanced users, Windows + X opens a menu over the Metro homescreen giving access to classic system tools like Control Panel and Task Manager. |
|---|---|
| Windows + R | Launch the Run dialogue (Desktop mode). |
| Windows + E | Launch Windows Explorer (Desktop mode). |
| Windows + K | Brings up a list of all connected devices, like wireless peripherals. |
| Windows + F | Launch a file search. |
| Windows + "," | Windows + comma minimises all applications and shows the Desktop, but for only as long as you hold down the keys. |
| Windows + M | Minimises all active Desktop applications. |
| Windows + Shift+ M | Maximises all active Desktop applications. |
These shortcuts should be enough to give you a head start into using Windows 8 without a touchscreen.
Wednesday 24 October 2012
Common Internet Error Codes
Common Internet Error Codes
Here are the most common codes and messages you're likely to see on your Web browser (HTTP), when accessing Usenet, using e-mail, or using the FTP protocol to upload or download files.
Here are the most common codes and messages you're likely to see on your Web browser (HTTP), when accessing Usenet, using e-mail, or using the FTP protocol to upload or download files.
The codes can generally by grouped
as follows -
- 100-199 - Information Codes. Provide information about
the request or the servers involved.
- 200-299 - Success Codes. Indicate that the request was
accepted or the requested file has no content (empty).
- 300-399 - Redirects. Requested content has moved.
- 400-499 - Client Errors. Cannot find content or you
don't have the correct permissions to access it.
- 500-599 - Server Errors. There is a problem at the
server end stopping the request from completing successfully.
Code
|
Title
|
Description
|
100
|
Continue
|
|
101
|
Switching Protocols
|
|
200
|
OK
|
The request was successful
|
201
|
Created
|
The request was successful and a
new resource was created
|
202
|
Accepted
|
The request was accepted for
processing, but the processing is not yet complete
|
203
|
Non-Authoritative Information
|
|
204
|
No Content
|
The server has processed the
request but there is no new information to be returned
|
205
|
Reset Content
|
|
206
|
Partial Content
|
|
300
|
Multiple Choices
|
The requested resource is available
at one or more locations
|
301
|
Moved Permanently
|
The requested resource has been
assigned a new URL and any further references should use this new URL
|
302
|
Moved Temporarily
|
The requested resource resides at
a different location, but will return to this location in the future
|
303
|
See Other
|
|
304
|
Not Modified
|
The requested resource has not
been modified since the date specified in the If-Modified_Since header
|
305
|
Use Proxy
|
|
400
|
Bad Request
|
The server could not properly
interpret the request. Normally means that either address hasn't been entered
correctly or the page no longer exists.
|
401
|
Unauthorised
|
The site being accessed is
protected and you either entered the incorrect password or the host does not
want users coming from your domain to enter.
|
402
|
Payment Required
|
|
403
|
Forbidden
|
You are not permitted to access
this document. It is either password-protected or the host does not want your
domain to enter.
|
404
|
Not Found
|
The host server can't find the
HTML document at the URL you've entered. Either you have mistyped the URL,
the document no longer exists, or you've been given the wrong URL.
|
405
|
Method Not Allowed
|
|
406
|
Not Acceptable
|
|
407
|
Proxy Authentication
Required
|
|
408
|
Request Time-Out
|
|
409
|
Conflict
|
|
410
|
Gone
|
|
411
|
Length Required
|
|
412
|
Precondition Failed
|
|
413
|
Request Entity Too Large
|
|
414
|
Request-URL Too Large
|
|
415
|
Unsupported Media Type
|
|
500
|
Internal Server Error
|
The server could not satisfy the
request due to an internal error condition.
|
501
|
Not Implemented
|
|
502
|
Bad Gateway
|
The server received an invalid
response from the server from which it was trying to retrieve information.
|
503
|
Out of Resources
|
|
504
|
Gateway Time-Out
|
|
505
|
HTTP Version not supported
|
|
Bad File Request
|
The form you're trying to access
is not supported by your browser or there is an error in the form.
|
|
Cannot Add Form Submission Result
to Bookmark List
|
Occurs when you've submitted a
search request and then try to save the result as a bookmark. Even though it
may look like a valid address, the resulting page does not have a URL that
can be reused so it can't be added to your bookmark list.
|
|
Connection Refused by Host
|
You're not permitted to access
this document either because it's password-protected or the host doesn't
permit your domain to enter.
|
|
Failed DNS Lookup
|
The URL you requested could not be
translated into a valid Internet address by the domain name system. This is
either a result of a mistake in the system or you could have mistakenly
entered an incorrect URL
|
|
File Contains no Data
|
The site you accessed doesn't
contain any Web pages on it.
|
|
Helper Application not Found
|
You're trying to load a file of a
type that your browser doesn't recognise
|
|
Host Unavailable
|
The server computer that hosts
this site could not be reached. The server may be offline or down for
maintenance
|
|
Host Unknown
|
The server you're trying to reach
is not connected, or you have lost your own connection. You may have also entered
the URL incorrectly.
|
|
Network Connection was Refused by
the Server
|
Some servers have limits on the
number of people or request they can handle at a time. If you get this
message, the server is probably too busy to handle one more user.
|
|
NNTP Server Error
|
This error occurs when you are
trying to log on to a Usenet newsgroup. An NNTP server is part of your
Internet service provider's software, so if this error occurs the software
may be malfunctioning or the newsgroup does not exist.
|
|
Permission Denied
|
When connecting to an FTP site,
can signify that you cannot upload to the site, download a certain file, or
access a certain directory.
|
|
Too Many Connections - Try Again
Later
|
The limit to the number of people
who can use the site at one time has been exceeded.
|
|
Too Many Users
|
To avoid slow uploading and
downloading rates, site administrators set a maximum number of users that can
access the site at one time. Your request is one too many.
|
|
Unable to Locate Host
|
The server is either down for
maintenance or you may have lost your connection.
|
|
Unable to Locate the Server
|
The server indicated in the URL
you typed or clicked from either no longer exists or was entered incorrectly.
|
|
Viewer not Found
|
Your browser doesn't recognise
files of this type.
|
|
You Can't Log on as an Anonymous
User
|
You must have a valid username and
password to log onto this FTP site.
|
How
to Transfer Data from One Laptop to Another using Crossover Cable
Lots of time my friends asked me how
to transfer their data from his one laptop to new one without using flash
drives or CD/DVDs or without going to a LAN network. And this remind me to
write an article about how to transfer data from old PC/Laptops to new ones.
There are two ways you can transfer
your data:
- Using ad-hoc wireless network (that uses wireless
card).
- Using Cross-Over Cable.
As, this article is about Crossover
Cable, there are certain steps you need to make sure, setup are configured
properly. I will try to go through all the different steps.
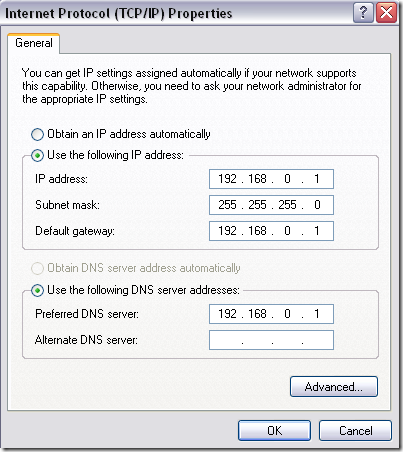
Step
1 – Configure IP Addresses
Usually, if you are using a
crossover cable to connect two computers, the computers are not connected to a
LAN network. In this case, you will need to configure static IP addresses for
each computer.
You have to make sure that both computers have IP addresses that are on the same subnet. For example, if you give one computer an IP address of 192.168.0.1, then you should give the second computer an IP of 192.168.0.2. (There can’t be two apartments with same house number in the city)
If you used the above IP addresses, you should use a subnet mask of 255.255.255.0. If you use an incorrect subnet mask, the connection will not work. (Subnet mask is responsible for dividing IP address into network address and host address)
Lastly, the value for the default gateway should be the same on both machines. You can pick which IP address you want to use, but use it on both computers for the default gateway.
Look at the screenshot:
Step
2 –Connect both computers with Crossover Cable
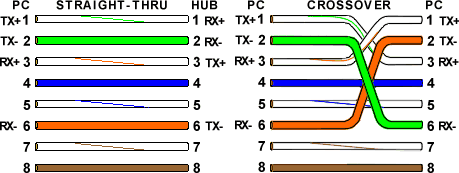
The second thing you need to verify
is that you actually have a proper crossover cable. Basically, there are a few
different types of crossover cables, but it’s best to get the standard crossover
cable where the green and orange pairs are swapped and the brown and blue pairs
stay in the same position.
The only pins that need to be crossed are 1,3 and 2,6. So just check your cable on both end and make sure it matches the diagram.
The only pins that need to be crossed are 1,3 and 2,6. So just check your cable on both end and make sure it matches the diagram.
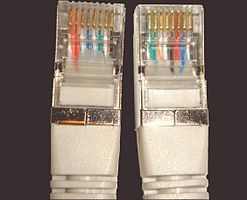
Crossover cable internal structure
(left) and image (right).
Step
3 – Local User Accounts
If you’re having problems accessing
files both ways, you may have to create a user account on each computer that
has the same name and same password. This helps get past any kind of Access is
Denied errors that may pop up.
Make sure the accounts are administrator accounts also! It’s best to create a new account rather than rename a current account.
Make sure the accounts are administrator accounts also! It’s best to create a new account rather than rename a current account.
Step
4 – Disable Firewalls
(remember, you are in standalone mode so it’s safe to disable temporarily).
(remember, you are in standalone mode so it’s safe to disable temporarily).
Finally, you should disable the
firewall on both computers to ensure that none of the file sharing ports are
being blocked. You can do this by going to Control Panel and then Windows
Firewall. Click on Off.
Now You have done! Be Sure you have
followed the steps same as it was written here.
In case, if you would face any problem, write your problem with a screenshot,I will try to reply as early as possible.
In case, if you would face any problem, write your problem with a screenshot,I will try to reply as early as possible.
Tuesday 23 October 2012
Playing with the Android emulator on your computer is a pretty geeky endeavor, but YouWave makes it easy to accomplish on your Windows PC. If you can download and install a Windows program, you can have an Android virtual machine running on your desktop in just a few minutes. All without ever touching the SDK or Sun's JDK. As a bonus, the Window it runs in has a really easy method of installing third party apps from free Android applications stores, as well as apps downloaded to your PC.
.jpg)
YouWave for Android
- Runs Android apps and app stores on your PC, no phone required
- Download thousands of apps online via app stores within youwave
- High performance - The fastest way to run Android on pc
- Easy to use - Easy to install. Easy to import and run apps
Key Technical Features
- Supports Android 2.3 Gingerbread (new)
- Runs on Windows XP/Vista/7, 32/64 bit
- Simulated SD card functionality - enables game saving
- Saved State - enables fast restart
- Enables multi-player online games
- Dynamic rotating - phone-like instant response (new)
- Volume control buttons (new)
- Retractable control panel (new)
Home Page - http://youwave.com/
Download :- http://www.4shared.com/rar/GVng-6_i/YouWave_for_Android_234.html
================
[INSTALL NOTES]
================
Step 1: Please use 7Zip/WinRAR/Universal Extractor to EXTRACT FILES.
Step 2: run the setup
Step 3: Apply patch
Monday 1 October 2012
How to send password protected Email
Now a days, Email is the most common media for information interchange. It is used by most of the working person. Most of the popular email servers such as GMail, Yahoo mail, Hotmail and many other provide this email service for free. Users need to create a free account and then they can use their account for sending and recieveing emails.
But Cyber criminals are always try to hack passwords of users email account to read emails and misuse the account. Do you know? you can also protect each mail sent by you with a password for better information security. If some one maneged to get into the account, he would not be able to read the email without knowing the password. To send the password protect email, you have to use a third party service named as LockBin
go the link http://adf.ly/54hxG
Fill the form and send the mail. And also inform receiver that you have sent the mail and password as well
Recipient will get the email with a link. To read the email, he will have to go the link and verifiy the password which you have entered while sending the email.
After submitting password Receiver can view message.
This service is free and easy to use. So use this for secure communication over the internet.
Wednesday 19 September 2012
How to Update the Samsung Galaxy SL I9003 to Android 2.3.5 XXKPN Firmware
Owners of the Samsung Galaxy SL I9003 can now update their devices to Android 2.3.5 Gingerbread build XXKPN. The new XXKPN firmware update comes at a time when many users experience numerous bugs in earlier Gingerbread versions. Happy owners of the Samsung Galaxy SL I9003 are more than pleased to report that they have a fully working firmware without any more bugs.
If you’re familiar with updating your phone via KIES, then updating to the XXKPN version will never be a problem. The latest Gingerbread update can now be downloaded and flashed through your phone via KIES. But, in the event that your phone does not get detected, you can still apply the firmware manually. The instructions in this article are for manually updating your phone to build XXKPN.
The XXKPN Gingerbread 2.3.5 update comes with tons of performance upgrades along the way, including faster Internet browsing, faster Android Market browsing even at slow Internet speeds, and a revamped user interface that will greatly extend overall battery life.
Requirements
Make sure you have an ample supply of battery life left in your device. We advise that you have at least 60% battery left to ensure your phone will not turn off during the firmware update process.
Make a backup of your phone’s data (e.g., contacts, messages, multimedia, settings, and other important files) as there might be a chance that your phone may be corrupted during the installation process.
Enable USB Debugging on your phone. This can be done by going to Settings > Applications > Development > USB Debugging.
Once the necessary requirements have been met you can now proceed with the installation process.
Installation
Here are the steps for installing the firmware to your phone:
Download the latest firmware update files to your computer. Get the ZIP file from here.
Unzip the contents of the ZIP file. When asked for a password, type “androidauthority.com” (without the quotes).
The ZIP file contains three files: I9003XXKPN_I9003XXKPN_I9003SERKPN_HOME.tar.md5, Odin3_v1.0, and SS_DL.dll. In the event that a single file is missing, you need to download again and extract the files before proceeding any further.
Open the Odin flash tool from the extracted files.
Turn off your phone.
Boot your phone into download mode. You can enter download mode by pressing and holding the Volume Down key + OK button (center button), and simultaneously pressing the Power button.
Connect your phone to the computer using a USB cable. Make sure Odin is still running on your computer.
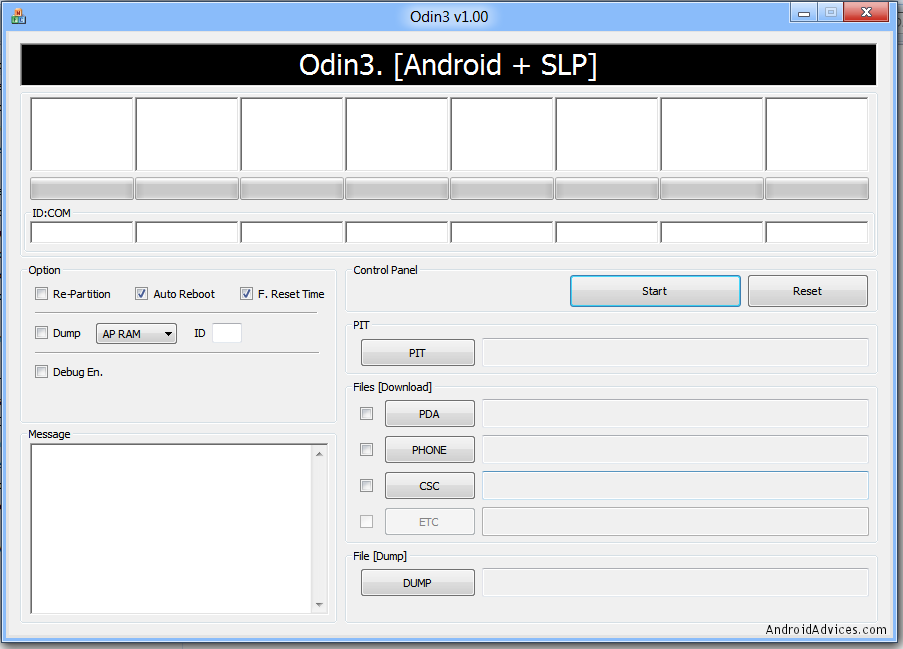

Click the PDA button in Odin. In the popup window, choose I9003XXKPN_I9003XXKPN_I9003SERKPN_HOME.tar.md5.
Check that the other options in Odin are checked/unchecked as in the screenshot below:
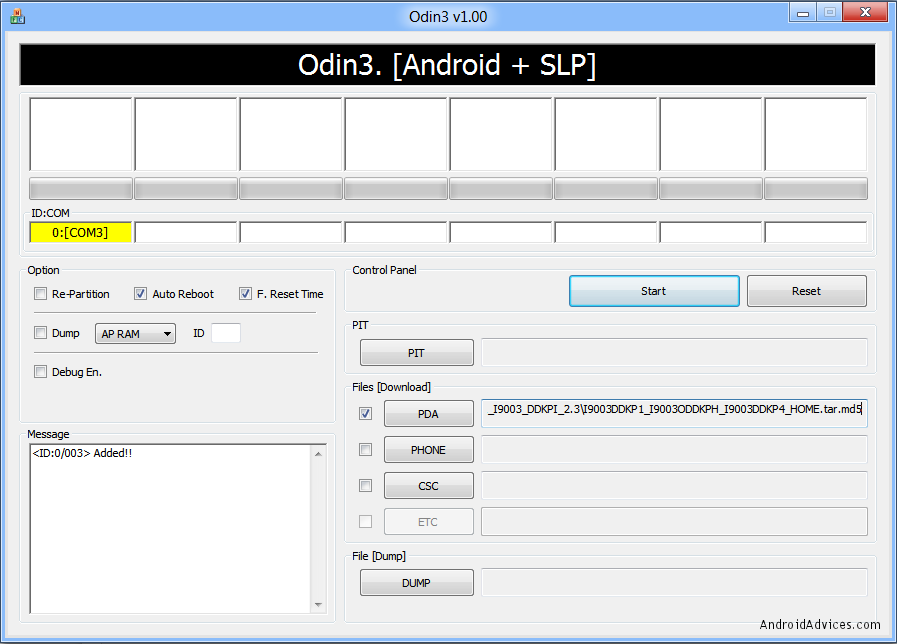
Hit the Start button in Odin to begin the firmware update process.
Your phone will reboot after the flashing is completed.
Check whether or not you have successfully updated your phone by heading to Applications > Settings > About Phone. The firmware version ought to show XXKPN 2.3.5 Gingerbread.
Turn off your phone.
Reboot the phone into recovery mode by pressing and holding down the Volume Up + OK buttons simultaneously and pressing the Power button while holding down those buttons.
In the recovery mode menu, choose “Wipe data/factory reset.”
Choose “Wipe Cache partition”.
Go back to the main menu and then select “Reboot system now”.
Congratulations! You now have Android 2.3.5 Gingerbread build XXKPN on your Samsung Galaxy SL I9003.
http://www.4shared.com/rar/UScTTlQE/GalaxySL_I9003_DDKPI_236.html
*androidadvices.com*
Subscribe to:
Posts (Atom)