Tuesday 4 August 2015

Windows 10: Upgrade or Clean Install

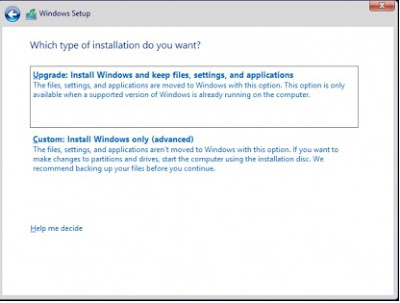
You probably are thinking about upgrading your current operating system to windows 10. You may or may not know there are two ways to install windows 10 that's either as an upgrade or clean install.

Now there are pros & cons to both but there is really one way to do it and that would be a clean install.

Backup your data in upgrade but specially in clean install.


Upgrade :- In upgrade windows 10 is installed over your current operating system so that all your files and setting are restored so when installation is done you won't any changes expect some programs might not work due to compatibility issue. Upgrade is easier and is less hassle. There are problems in upgrading any operating system. Old programs will stay that you don't use anymore. Any Virus Or spyware will also stay is you had. More things could go wrong. Operating system needs to keep old files and setting and write new operating system files. Upgrading the operating system may lead in lower performance just doing update because of all the above reason.


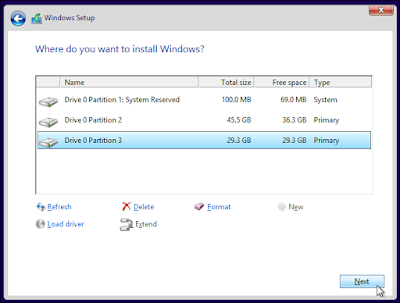
Clean Install :- In clean install everything will be brand new. No old or dead programs that does not work. This will lead to better performance , in fact you are going to get the best performance you possibly can because there is nothing that shouldn't be there. User needs a bit more technical knowledge in clean install because of creating partition or selecting partition in which you want to install. It a long and painful process on reinstalling every program again but its worth it.

Saturday 1 August 2015

Tab Snooze {Chrome Extension}

There Are Good Extensions In Chrome Web Store! Today We Are Going To Take A Look At Tab Snooze !


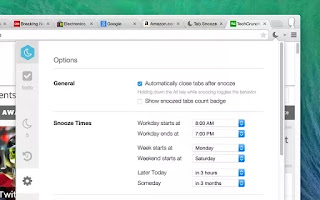
Tab Snooze is a extension for a problem which user never realized they had. Tab are like to do list in browser as said by the guys at Tab Snooze and they are correct. User who start multiple tabs while browsing and at times it turns to be mess. This extension help in clearing the mess. Staring at tabs which you are unable to address is not going to help you can't deal with now and make them appear when you think you have time to deal with them or else open them when you have time to deal with those tabs. Tab snooze have predefined option to choose from or else choose a custom date for the tab to appear. It works as advertised. At times i face issue like there are too many tabs and to snooze a tab i need to find a tab to snooze first for which i use another handy extension named quick tab which is a good extension for finding a tab in chrome browser. I highly recommend user to try these extension if they are core user and also causal user can try. Anyway these extension are free so there is nothing to lose if you try it.

Tab Snooze
Quick Tab

Thursday 19 February 2015

How to Disable Login Screen in Windows 8, 8.1 & 10

Your Windows PC, if you’re running Windows 8 or Windows 10, is tied to your Live account. When you login to your system you have to enter the same password that could open your Hotmail/outlook email account, log you into Skype, and even buy apps from the Windows App Store. Unfortunately, that’s also the only thing preventing access to your PC. If you aren’t too bothered about securing your computer with a password, and are just plain annoyed with having to login in repeatedly, there is a simple way to disable it so that you can just dive right in and start using your PC. Here’s how.
Right-click the Start button and select the Run option. Type netplwiz and hit enter.


This will open the User Accounts window. There are other ways to open this window; you can use the Control Panel as well. The Run dialogue is the quickest way to open it. If you have several different accounts configured, choose the one that you would like to skip the whole login and password option for. Uncheck the ‘Users must enter a user name and password to use this computer’ and click Apply at the bottom.


Restart your system and you will see you no longer have to enter a password to start using it. Disabling the password has pros and cons of course, so be mindful that you’re taking a layer of security off your system and trading it in for convenience by doing this.

Thursday 1 January 2015

Enable Android's Secret Right-to-Left Layout If You're Left Handed

Android: Your phone's default layout caters to the right-handed user. If you're left-handed, switch your layout to right-to-left with just a tap to be more comfortable using your device.

First you need to get into your developer options, then you can enable the layout change. Here's how:

Go into Settings > About Phone.
Scroll down until you see "Build Number" and tap it seven times in quick succession. This will enable developer options (if they're not enabled already.)
Once your phone tells you you're a developer, hit the back button to go to the main settings.
At the bottom, right above About Phone, you'll now see "Developer Options" where it wasn't before. Tap it.
Scroll down and tap the box to enable "Force RTL layout direction".
Your layout should instantly switch, giving your left thumb better reach to tap everything you need without so much strain. In addition, you'll see the layout direction of your home screen has changed. You'll pull to open Google Now the same way

Monday 3 November 2014

Sticky Notes

  • To open a new Sticky Note, type sticky in start search and hit Enter.
  • To change its size, drag it from its bottom right corner.
  • To change its color, right click the note and then click the color you want.
  • To create a new sticky note, click on the ‘+‘ sign in its top left corner.
  • To close a sticky note, right click on its taskbar icon and select ‘Close window’. If you reopen Stiky Notes now, you will see the earlier Notes. The Notes will appear exactly where you left them, even if you restart your Windows computer.
  • To delete a sticky note click on the ‘x‘ mark in its top right corner.
Once its running and you start making notes, you can use the following keyboard shortcut keys to format its text:
Select the text where required, and then press the desired keys:
  1. Bold: Ctrl+B
  2. Italics: Ctrl+I
  3. Underline: Ctrl+U
  4. Strikethrough: Ctrl+T
  5. Bullet list: Ctrl+Shift+L
  6. Increase size of text: Ctrl+Shift+>
  7. Decrease size of text: Ctrl+Shift+<
  8. See the options when you press Ctrl+Shift+L each time (1 to 5 times).. To get Roman numerals: Press 5 times, Ctrl+Shift+L.
  9. Capitalize (or otherwise) highlighted letters: Ctrl+Shift+A
  10. Right Align : Ctrl+R
  11. Center align: Ctrl+E
  12. Left Align: Ctrl+L
  13. Single line space: Ctrl+1
  14. Double line space: Ctrl+2
  15. 1.5 line space: Ctrl+5
Ctrl+A, Ctrl+C, Ctrl+V, etc of course work as usual. Know any more? Do share below in the comments!

Backup, Save, Restore Sticky Notes

You can backup the Windows 7 Sticky Notes by backing up this file to another location:
C:\Users\Username\AppData\Roaming\Microsoft\Sticky Notes\StickyNotes.snt
You may have to show hidden/system files via the Folder Options.
To restore it, delete the sticky notes from your desktop and copy paste the backed up one into this folder:
C:\Users\Username\AppData\Roaming\Microsoft\Sticky Notes folder

Turn the Sticky Note delete warning back on

If you have at any point, on selecting delete,  opted to NOT have the confirmation box show up again, by selecting Don’t Display this message again, and would now like to get this delete confirmation box, here is the way to do it.
deletenote 400x196 Sticky Notes in Windows 7 | 8: Tips to use, save, format, backup, restore
Open Registry Editor and navigate to the following key :
stickyreg Sticky Notes in Windows 7 | 8: Tips to use, save, format, backup, restore
HKEY_CURRENT_USER\Software\Microsoft\Windows\CurrentVersion\Applets\StickyNotes
Now delete the value called PROMPT_ON_DELETE or set its value to 1.
If you do not want to touch the Windows registry, you could simply download our freeware FixWin to fix the issue, quickly.

Change Sticky Notes font

Windows uses the Segoe Print font. Changing of the default is not supported in Sticky Notes. What you can do is type your text in the desired font in a text editor like Word, and copy-paste it here. The Sticky Note should display the text in that font. Let us know if this works for you.

Launch Multiple Programs From A Single Shortcut Using A Batch File

Some PC applications just work together like two peas in a pod. I’m talking about pairs like Winamp and Last.fm. There’s Skype and Pidgin, Steam and Raptr, and more. When you’re using one of these, launching the next one just feels natural. However, having too many paired program groups like this can really cause some serious clutter on the desktop.
That being said, is there really a need to have both shortcuts on your desktopwhen two applications work alongside each other? If you don’t think so and you’re running Windows, let me show you how to combine both applications into a single shortcut icon for your desktop.

Pick Your Icon

The first step to setting this up, after you’ve picked out the two (or more) applications that you want to combine into a single shortcut, is selecting your main shortcut icon. This is an optional step of the process, but bypassing it means that you’ll be using the Windows icon for every batch file as your shortcut icon.
batfile1   Launch Multiple Programs From A Single Shortcut Using A Batch File
If the desktop icon you want to use is already on the desktop, then good. Keep it there. If not, find the application whose icon you want to use (either through your Start menu or through Windows Explorer), right-click on it, and select Desktop (create shortcut) from the Send to menu.

Get Program Paths

The next step is to collect the program paths of the applications that you are trying to launch. Again, to do this you can use the Start menu or Windows Explorer. Simply find the application, right-click on it, and select Properties. The Target field is what we’re looking for.
batfile2   Launch Multiple Programs From A Single Shortcut Using A Batch File
Copy what’s in that field and paste it into an empty Notepad window so that you have it somewhere easily accessible. Do this same thing with the second program that you’re trying to launch.

Create the Batch File

To make this work, we now need to take those two application paths and work them into a batch file. We have explained how to write simple batch file previously. Open the Notepad file that contains the program paths you copied earlier and adjust it to look like the example below.
@echo off
cd "C:\Program Files\CCleaner"
start CCleaner64.exe
cd "C:\Program Files (x86)\Wunderlist2"
start Wunderlist.exe
exit
Above is an example of the complete batch file script. Below is a breakdown of what is going on in the script.
@echo off
This simply prevents commands from being displayed in the command prompt, which is used to execute your batch file.
cd "C:\Program Files\CCleaner"
This is changing our directory to the CCleaner directory (which we got from the program path earlier).
start CCleaner64.exe
This is launching the executable file (that we noted in Notepad earlier) from within the directory we just navigated to.
exit
That one’s kind of self-explanatory.
batfile3   Launch Multiple Programs From A Single Shortcut Using A Batch File
In Notepad, save this file (making sure your Save as type is set to All Files) with the .bat extension. Take note of the path where you’ve saved this file at, in Notepad, because we’ll need it in the next step.

Point Your Shortcut to the Batch File

Remember that icon we placed on the desktop earlier? Right-click it, select Properties, and look at the Target field. This should display the path to your application.
batfile4   Launch Multiple Programs From A Single Shortcut Using A Batch File
Now, change that to the path of your batch file. Click Apply and OK.

Launch Your Batch File From The Shortcut

Now, double-click the shortcut icon on your desktop. You should see a command prompt window quickly open, then close (as the first line of the batch file forces), then your two applications should launch!

Conclusion

As someone who really appreciates automation, it’s worth it to take these five minutes of your time to save yourself the unnecessary clicks and effort it would otherwise take you to launch two applications at once. It keeps your desktop nice and tidy, too.
Got any neat ideas for other ways that this batch file trick could work? Any suggestions for program pairs that you’d throw in a batch file like this? Leave me a comment below and let’s talk about it!
Are batch files really not your thing? Check out my favorite application launcher for WindowsFingertips! Feeling cluttered on your desktop but really not interesting in combining shortcut icons? Here’s how to clean up your desktop efficiently!

Interrupted Download? Here’s How To Resume In Chrome

Have you ever been in the process of downloading a large file in Chrome, then suddenly and without warning, your Internet gets disconnected or your computer hangs and you are forced to reboot? A download could also be interrupted by accidentally removing the electrical power cord from the wall socket or through power outage in your area.
When you finally get your computer up and running again, you agonizingly realize your download progress has disappeared and you have to restart.
chrome download page   Interrupted Download? Heres How To Resume In Chrome
If this happens a couple of times, a simple download can take ages to complete. If you are on a limited bandwidth plan or your carrier throttles your data after you exceed the fair usage limit, the consequences of an interrupted download can be expensive.
Unfortunately, unlike Firefox and Internet Explorer which allow you to easily resume interrupted downloads, this is one area that Chrome fails miserably. If you are a die-hard Chrome user, then the following workaround should help you avoid restarting a big download. Take note that I tested this in Windows 7.

WGet

This handy application is free and is part of the GNU project. Its primary purpose is to retrieve content from web servers. The name is a combination of the words “World Wide Web” and “Get”. Download the program and install it on your computer. Do not install it in the default programs folder. Select a different install location, because you will need to copy the failed download file to the same location as Wget’s executable file.
wget select install folder   Interrupted Download? Heres How To Resume In Chrome
Locate the unconfirmed download file, paste it into the same location as the Wget executable file. Look in the Google Drive > GnuWin32 > Bin folder.
wget location1   Interrupted Download? Heres How To Resume In Chrome
Rename it by deleting the “.crdownload” extension as shown below. Click Yes in the notification that pops up.
renaming chrome download file   Interrupted Download? Heres How To Resume In Chrome
Next, in the download location folder, press and hold down the Shift key, right click and select Open Command Window Here.
wget command window   Interrupted Download? Heres How To Resume In Chrome
A command window should launch. Type in the following command wget -c [URL], where [URL] is the download link, and press Enter. You can find the download link by going to your Chrome downloads page using the shortcut Ctrl +J.
wget command window download   Interrupted Download? Heres How To Resume In Chrome
You will notice that the download picks up where it left off before the interruption. Once the download completes, the command window closes. Confirm that file has been downloaded by checking the download location.
wget successful download   Interrupted Download? Heres How To Resume In Chrome

Can You Do It With An Extension or App?

Unfortunately, there isn’t a Chrome download manager that resumes interrupted downloads in same way a Firefox add-on such as DownThemAll is able do it. I tested out several popular Chrome download managers and they all failed to pick up a download at the point it was interrupted. The only option available was to restart the download. Chrome simply doesn’t have this functionality yet but we hope the developers will include this feature in the next release. This is yet another thing Chrome doesn’t let you do, that Firefox does.

Experimental Features

There is a Chrome experimental feature that is supposed to enable download resumption though I couldn’t get it to work in Windows 7. The feature can be accessed by typing “Chrome://flags” in your URL bar. This takes you to Chrome’s experimental features. Scroll down and look for Enable Download Resumption andclick Enable.
chrome enable download resumption   Interrupted Download? Heres How To Resume In Chrome
If this works, you should see a new context menu item labelled Resumeuponright clicking on the file in Chrome’s download page . But, like I said, this is an experimental feature and the developers make no guarantees on whether it works. To the best of my knowledge, it doesn’t work in Windows 7 and I am only including this information here for the benefit of Mac, Linux and Chrome OS users who may have better luck with the feature.

How Do You Resume Your Downloads?

Finally, if you need to download a really big file, for the moment it is best to use Firefox if your Internet connection is choppy. Alternatively, you could search online for the torrent version of the file and download it using a Bit Torrent client such uTorrent. This certainly adds a twist to the Chrome Vs Firefox Vs Opera debate.
Have you ever had to resume an interrupted download in Chrome?